Bank Bottles
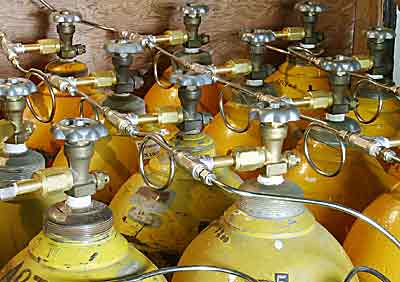 4000 PSI was the minimum bank pressure I had targeted for the air banks of this
fill station. This was due not for bank-capacity reasons, but that my PST tanks
are all high pressure (3445 PSI) versions. 4,000 PSI banks would allow for
several fills (depending
on the banks' capacity) before having to run a compressor to top the banks off.
Smaller banks deplete more often during larger fill jobs and become inconvenient
when time is pressing.
Bank bottles are not commonly made for just
4,000 PSI: the general choices in the neighborhood are 3000, 3600, and
4500 PSI. Prices rise dramatically for the 4500 PSI bottles over the others by
almost $150-$400 each for new bottles. I refused to invest that much for a
set of new bank bottles, so I began looking for used and/or refurbished bottles.
Royal Pain
The first reasonable company I contacted (on a tip from
Ted Green) that sold used cylinders was Queen Cylinder
of Ohio. Queen was selling refurbished 4500 PSI bottles with the
buyer's choice of a new CGA valve, choice of new paint, and fresh hydro
for only $225. Freight for ten bottles to eastern VA was
$270.70. The price of their new 4500 PSI bottles at the time was
$350. Ten refurbished bottles was a bit more than I wanted to
invest in at the time. As it turned out, the banks for this fill
station ultimately ended up being the largest investment in the entire
project. I located some other locals who wanted to get in on the
purchase & shipping deal for a few bottles of their own, so this
spread the costs around for everyone that was interested. Around
mid-year 2005, I was finally prepared to pull the trigger on a purchase
and contacted Queen again. Unfortunately, they had raised their
prices by 50% in the previous few months since I had last
contacted them. Their excuse for the sudden increase was that the
bottles had suddenly become very popular with the paint-ball
crowds. Refusing to pay the extra premium, I went looking
elsewhere for better pricing.
The Lucky Break
A fellow diver offered another tip that led me to Air Power International, located
next to Philadelphia:
http://www.airpower-intl.com They had a good number of
"refurbished" 3600 PSI bottles being sold at the time for $100 each in
quantities of 10 or more, or $125 individually. Many of these bottles were
manufactured in the 70's & 80's and were close to (or just beyond) their
2'nd or 3'rd ten-year hydro test-date. These bottles looked at least as
robust as the ones that you rent from your local gas suppliers: ones that have bounced around on the local trucks for a 30-60
years at a time, subjected to rapid fill-speeds at the industrial gas plants. The valves on
these were all CGA-347 (3000 -5500 PSI service) and had burst disks rated for
6200 PSI. My concern over the bank bottles being out
of hydro was not as much a factor as long as the burst disk did its job and failed before the bottle did.
But for peace of mind, I checked with local hydro-testing companies and hydros
for these generally cost
$25-$35 per bottle. In conversation with Steve Furst of
Air Power International, he confirmed that these older bank bottles (like most) were
made for a very long and abusive service life and consequently over-made as
safety factor against
that.
3600 PSI is only 155 PSI more than my HP steel SCUBA tanks required for a full
fill at 3445 PSI. A large number of bank bottles would be needed in order
to be able to fill just one set before having to run the compressor. If
you are comfortable with the controversial idea of a 10% overfill, this turns a
3600 PSI bottle (3600 + 10%) into a 3960 PSI bottle, which is very close
to the 4,000 PSI capacity sought in my original plans. Overfilling tactic
triples the amount of air a single bank bottle could provide to top off HP steel
tanks. 10% over-fills are very likely still within reasonable safety
margins. This decision led to purchasing some of
these 3600 bank bottles with the intent to keep them pumped up to the 4000 PSI originally
planned for.
Most of these bottles came from fire stations that are upgrading
their older SCBA systems (3000-3500 PSI) to higher-pressure (4000-5500)
SCBA systems. In the wake of 9/11, officials in New York City and other
municipalities suddenly experienced the problem of having to return to
home stations to recharge their SCBA bottles, instead of right on the
emergency vehicles on-site. API has been designing and installing
special Mako SCBA compressors that mount on emergency vehicles and are
driven off hydraulics or generators. After these upgrades, most
stations have little use for the lower-pressure SCBA systems in house
or bank bottles. API has been buying these older systems as
trade-in value. Steve Furst said API maintained and regularly
serviced (including all filters) the systems from which he obtained
these bottles, so he knew they were not contaminated or abused by the
compressors that filled them. In the few bottles that I later
opened up, bare metal was still showing in most places, with a few
streaks of brown on some, probably from water left over from their last
hydros.
Morphing Designs
10 bank bottles was more than the 6 bottles than my
original plan required. But with reasonably-priced bottles available,
further possibilities open up. Having a limited set of doubles and deco stages
at the time, I would often have to dump some of the mixes in order to
remix them into a new blend. With a helium/oxygen analyzer and a Haskel, there
was just no compelling reason to dump perfectly good mix vice recycling into
later mixes. So the two extra bottles were dedicated to hold leftover nitrox and trimix. The
bank layout then became 2 air banks of 3 bottles each, and one air bank of
2 bottles.
My oxygen and helium supply bottles from a
local gas supplier cost me $65 a year to lease. This supplier confided to
my buddy, who also leases bottles there,that they make a lot of their profit from bottle
leases. This supplier won't allow or condone customer-owned bottles at all, as you
can guess. The cost for a 282cf bottle of oxygen was $13, so it was
worthwhile to continue dealing with them, factoring the bottle lease into the
yearly consumption rates. However, these costs caused me to consider
alternatives.
Air Power International was selling used 2400
PSI bank bottles for $75 each at the time, which led to the idea of adding an
oxygen cascade to the project. Employing a Haskel, I could make one trip
to pick up 3-6 oxygen bottles from the gas supplier, pump my oxygen cascade
full, and take them all back after a day or two. Outside of an extra trip,
doing this traded a yearly lease for just a couple bottles into a daily lease
for a lot of bottles. Daily-lease costs are <$0.20 per bottle, or somewhere
close to dividing the yearly lease rate by 365 days. Elimination of the
$65 annual-lease cost per bottle would actually pay for privately-owned cascade
bottles after their first year of ownership.
I always had to run the Haskel in order to get service-pressure (3,000 PSI)
fills into my 100% deco bottles. So after further thought, the
2400-PSI bottles seemed like a waste when 3600 PSI bottles were available for
30% more in cost.. They would allow banking oxygen up to 3600 PSI, instead
of the 2200-2400 PSI that normally came in a supply
bottles. This would allow for a true, cascaded, O2-on-tap design and
reduces having to watch over a Haskel every time O2 top-offs are needed.
Of course, 3600 PSI was well above the pressures I intended to boost
oxygen to.
The desire for an additional 4 bottles for the oxygen cascade
also led to consideration for a
helium cascade for the same reasons. This culminated in planning for an
additional pair of bank bottles for a helium cascade, which could be filled
close to 4000 PSI . I made a trip
up to API and brought back ten more bottles (exercising the 10-bottle bulk
discount), which was all that API had available at
the time. While picking the bottles up, I was offered
four HC-4500's they had on hand for $150 each. The price was very attractive.
Thinking quick, these bottles would actually serve well as
a fourth, highest-pressure air bank, fully rated for the maximum pressure
planned. These extra bottles suddenly became part of the project and
bought them on the spot. Steve Furst pointed out that these HC-4500's were
not designed as robust as the other bottles. I just lifting them up by
hand, I could tell that they were much lighter than the other 3600-PSI bottles I
had bought. HC-4500's are not recommended for pressures higher than their rating.
But this was OK since I did not feel like pushing my RIX compressor that high already
expecting increased ring-wear pumping up to 4000 PSI alone.
CGA Valve Care
A few of the Sherwood CGA 347 valves on the bottles I bought were leaking a
little and difficult to tighten down the knob enough in order to stop the
leakage. I replaced the soft seats and some stem packings on these.
The Lower Plug & Seat Assembly only cost: $2.16 each and the Teflon packing
cost $0.71 each
O2-Cleaning
CGA valves come apart very similar to a SCUBA tank valve. The valves on
the 4 designated oxygen-cascade bottles were completely disassembled and
oxygen-cleaned. See the section further below on oxygen-cleaning for the
cleaning method I used.
I also oxygen-cleaned the four bottles intended for the oxygen-cascade.
Removing the valves is not as
difficult as some have expressed. I could have wrenched the valves off with a 15" pipe-wrench
if wanted to. But instead of marking up the sides of the soft brass CGA valves with
a pipe wrench, I happened to have a very-large adjustable wrench that suited
better.
Removing the valves did not require a "cheater bar" at all.
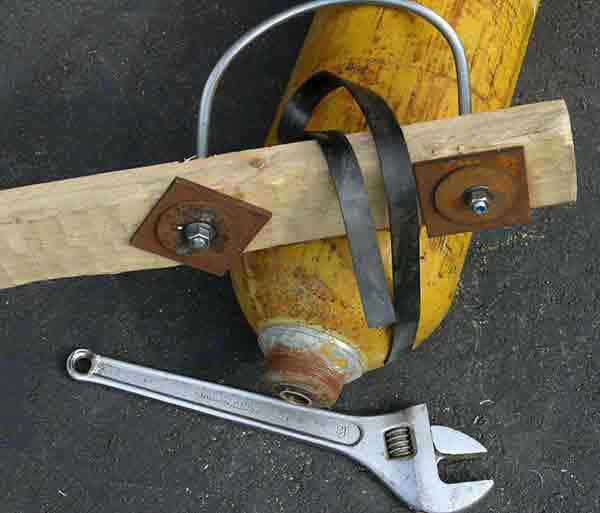 |
To get the CGA valves off, I made up a jig to hold the tank from
spinning. I fastened one end of some 1/2" all-thread rod
to a 2x4 board. To get the bend close to perfect, I put a bottle next
to the all-thread and bent the all-thread around the bottle until the free
end touched the 2x4. This initial bend sets the general shape of the
bottle into the all-thread and also leaves the far side as straight as
possible for where it has to fit through its own hole in board. For a 9.5"
diameter bottle, the holes were 9" inside-edge to inside-edge. The rubber
strip in the picture was just something I had laying around that worked well
enough to protect the finish of the bottle from the threads on the rod.
Bicycle tire would have suited just as well. Next, I unfastened the
all-thread off the board and used the bottle to wrap the all-thread around
into a complete U. Next, I inserted both ends of the all-thread
into the board and put on the bolts. I recommend large metal washers
to prevent the bolts getting sucked into the wood when tightening them down.
I cut off the excess length from the all thread but making sure it left a
couple inches of clearance when sliding a bottle into the loop. I
dressed up rough edges of the cut with a metal file.
Also pictured is the adjustable-wrench I used to unscrew and tighten the
CGA valves. |
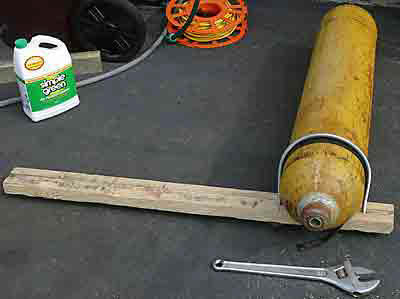 |
This is the cylinder secured in the jig. The all-thread nuts
shouldn't have to be tightened down too far to provide enough grip on the
tank. Note the rubber band placed between the all-thread and
tank-surface. |
 |
I used the following method to wash out the bottles. It was taught to me
at a local dive shop for oxygen-cleaning regular SCUBA cylinders.
Please do not accept this method as the only or best way to do it.
Other methods may be more easier and/or more effective. I filled the
bottles half-full of very-hot water.
This amount allows for the water to move with some speed when sloshed from end
to end, and also expose the sides to a good amount of water when it rushes
by. For detergent, I add a fluid ounce of Simple
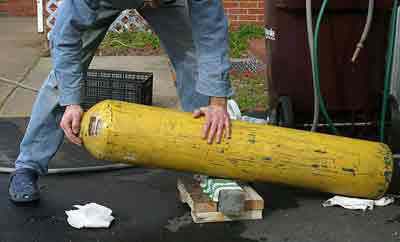
Green concentrate. To agitate the water inside, I set the tank on a 4x4 block and rock it back
and forth like a see-saw. I waited to hear/feel all the water slosh against one
end before tipping the tank to the other end. A wet rag on top of the
4x4 helped prevent the tank from sliding on the wood as it rocked from end
to end. After 4-5 sloshing cycles in one position, I would rotate the tank about
30 degrees and do another 4-5 sloshing cycles.
In this manner, I averaged about 1/4 turn every minute or so. I spent
about 4 minutes to make a
complete rotation of the tank, which exposed all the inside surfaces to
an equal amount of washing action. Rocking the tank for a while may cause your wrists
to ache, especially after doing several bottles! I would make a
second or third complete washing-rotation before I felt ready to drain the
tank. In all, this process took about 8 -12 minutes.
Next, I would fill the tank half full with clean (hot
preferred) water for the rinsing cycle, which was basically a repeat of the
method already mentioned above.
After finishing the initial rinse, it was not uncommon to see a few soap
suds float out with the last drops of rinse water. I would then follow
up with a second rinsing cycle.
An easier (and
more water-conservative) way to rinse any tank is to make a fitting on the end of a solid
pipe that could fit inside the tank opening and reach to the furthest end.
A spray-nozzle of some sort on the end up the pipe would make an
umbrella-shaped spray inside an inverted tank to effectively rinse all the
walls at once as the sprayer is withdrawn from the tank.. Regular garden-hose
fittings are too wide to fit through an NGT tank-opening, or they might make
a good nozzle |
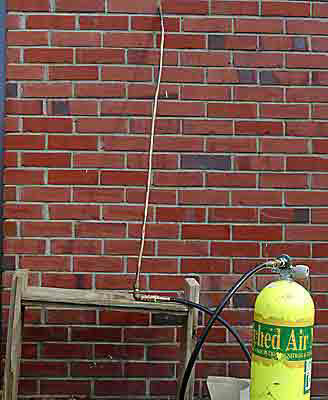 |
This drying stand (has a large hole in the cross-piece to secure the
tank's neck) and pipe was used to blast-dry the bottles
after they were washed. I set the tank upside down on the stand and
insert the copper tube all the way into the tank. The pipe was used to
deliver air to the top of the tank, and force the water droplets inside down
and out the neck. I have a shorter, smaller version that I use for
drying SCUBA tanks. |
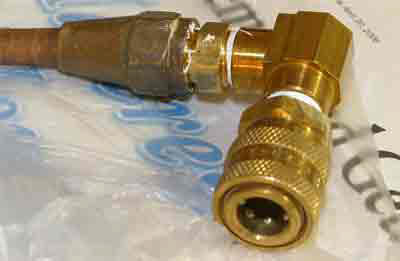 |
The end on the drying tube pictured above is just a piece of half-inch copper tubing with a flare fitting at the bottom.
A brass elbow, and one of my favorite Parker quick-disconnects rounds out
the materials for this. I use the Parker QD's on all my whip hoses and
other whip parts to allow me to connect just about anything to anything I
need. See the QD section below for more information on these
handy parts. Of course, everything shown here is oxygen-cleaned and
stored in plastic bags when not in use to keep ambient contamination away as
much as possible. |
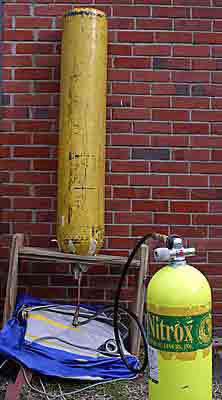 |
This crude stand held the bottles upright while
blasting them dry. The simple tank washing/drying stand pictured in the
Oxyhacker's Companion
is really the way I would recommend inverting the bottles with. Heavier boards
would be needed for the heavier bank bottles though. I place some material underneath the tank's opening to prevent dirt and
dust from flying everywhere when the SCUBA air supply valve is opened all
the way. For reference, this force and volume of the escaping air will
actually lift aluminum tanks right off a stand..
An AL-80's worth of air should be more than sufficient to dry any tank.
To start, I open the SCUBA valve just enough to
release a full blast of air for about 2-4 seconds. This initial blast
forces out the majority of water droplets clinging to the surface inside.
Next, I close the valve down quickly until it is just cracked enough to take
about 4 minutes to empty the AL-80. This seems to give any remaining moisture in the cylinder time to evaporate
in the super-dry air flowing past it. A tank still warm from a
hot-water washing helps speed the drying up. I didn't notice any
flash-rusting on most of the bottles after following this method, but it is a
possibility if one waits too long to dry the tank after rinsing it out. |
To screw the CGA valves back into the bottles, there is guidance in the
Technical Specifications PDF on
Sherwood's site that describes the special tightening technique used for the
National Gas Taper (NGT)-threaded CGA valves. If you're not familiar with
the NGT tightening-method, you should read this before attempting to install the
valve. You probably WILL need a "cheater bar" to get the valves back in
tight enough.
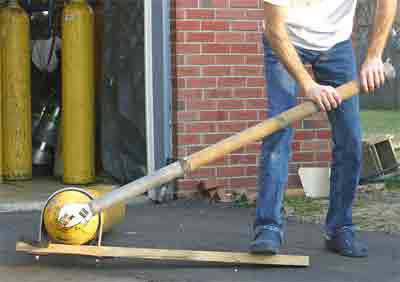 |
As shown here, it can take quite a bit of leverage to get the valves
tightened back to NGT specifications. A piece of pipe is being used as a
cheater bar here. |
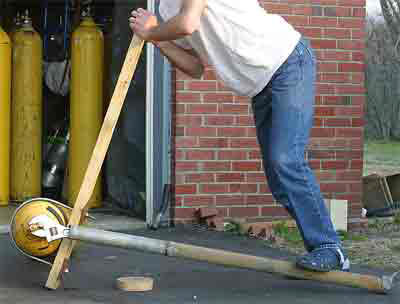 |
Once
the cheater bar is nearly laying on the ground, I picked up the jig and
continued to torque the valve as shown here. This method allows for
the awkward angles that would otherwise be encountered by just moving the
wrench a half-turn on the valve |
GO TO PAGE:
1 - Introduction
3 - Fittings 4
- Tubing 5 - Valves
6 - Manifolds, whips, gauges,O2-cleaning
7 - Results & Pictures
 4000 PSI was the minimum bank pressure I had targeted for the air banks of this
fill station. This was due not for bank-capacity reasons, but that my PST tanks
are all high pressure (3445 PSI) versions. 4,000 PSI banks would allow for
several fills (depending
on the banks' capacity) before having to run a compressor to top the banks off.
Smaller banks deplete more often during larger fill jobs and become inconvenient
when time is pressing.


