Tubing
So why use SS tubing instead of swaged hoses or CGA fittings?
- SS tubing is relatively cheap
- It can handle high pressures
- The fittings for it are cheaper than NPT equivalents
- The lengths and bends can be customized on the spot
Read
this before installing tubing into fittings and to gain a familiarity with
some options available.
Materials recommendation
SwageLok and many other fittings manufacturers have
great PDF files available that explain materials selection, like
this
one. Following the charts from the PDF, higher-pressure systems will likely need a 0.035
wall-thickness, 1/4", seamless SS tubing, instrumentation-grade preferred.. The (welded) seam type is not as
strong (but usually cheaper), and may still be suitable depending on what
pressures you want to target. 0.035 thick tubing is rated for 5100 PSI and the next
higher-pressure choice is 0.049 at 7500 PSI. For the welded-seam type of tubing, you
have to deduct 15% of those figures for its working pressure.
Buying
A friend of mine was able to
get me 100 feet of 0.035 wall-thickness 1/4" SS tubing, for about $60,
the average wholesale cost. It can come in a roll but you have to
unbend it. I got mine in straight lengths of 20 feet each.
I opted for the straight lengths instead of the coils since I didn't
feel like having to unbend the tubing and then re-bend it. Local
hydraulic and/or plumbing supply shops can usually carry (or can order)
several types of tubing, but normally charge in the neighborhood of
$1-$2 per foot.
Beware of eBay's Dutch-style bidding auctions! They are not too
common, but you will occasionally happen upon them.. The recommended way to bid
on this style of auction is to bid on a single item at a time, for as many as
you want, and steadily increase the price of each successive item's bid.
This stair-steps your price and allows you to win a good majority, if possible,
at an averaged price. Doing this does not raise the price that everyone
else would have to pay who are willing to pay a premium just to buy one item and
have to outbid you. It's always best to leave a few behind for the others
then you can get the remainder at a lower price. For example, I won an
entire lot through one of these auctions, even though I paid about 150% more per
unit in order to win them all of them. Had I only bid on 7 instead of 10,
my price would have been 30% per unit instead of 100%. Nevertheless, I
ended up using all of the items, so it was still a worthwhile deal considering
the trouble of finding more of these in smaller lots and then paying additional
shipping for each lot.
Cleaning
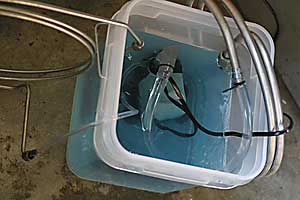 All
the tubing used for this project was oxygen-cleaned. It shouldn't be
necessary for air banks, but wasn't much trouble to do anyway. I use a
submersible ornamental-pond pump to push a 5% solution of
Blue Gold through
pipes, tubes, etc. The pump sits in a bucket of the solution and pumps it
in one end of the tube by means of some fittings, flexible tubing, and hose
clamps. The other end of whatever is being flushed has to be aimed back in
to the bucket. For long straight lengths of tubing, I just made a U-bend
halfway up the pipe. Pictured are a couple inter-stage cooling coils from
a RIX compressor that were getting flushed overnight.
Tubing can be air-blasted dry with compressed SCUBA air. This helped
get rid of sediments or other ambient impurities that happen to be suspended in
the rinse water, instead of allowing it to deposit onto the metal when the water
evaporates. To do the air blast, a
tube/NPT fitting
can be used on the tube. The fitting only needs about an1/8-1/4 turn past
finger-tight so the ferrules have a friction-bite but but not enough to indent the tubing
like a permanent swage. If you use this method, be careful with the amount of
air pressure you force through the tube or the tube could shoot loose from its
fitting.
Cutting
To cut tubing, I used a pipe-cutting clamp as seen in this picture.
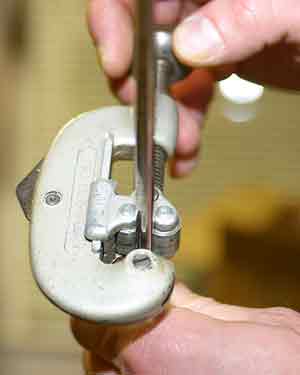 You can always use a hacksaw to cut the tubing, and
post-prep the tube end in the same way. The
clamp cutter works by just spinning it around the tubing and occasionally adding
a light twist of the screw to push the cutting-wheel deeper when it starts to spins freely. Eventually
the cutter presses a clean, right-angle cut into the pipe until the two halves break
free. This process leaves lip inside the pipe that has to be gently reamed out.
If you hacksaw the pipe, make sure that the blade does NOT chatter itself out of
the cut path and along the top of the tube. It WILL leave marks on the tubing
surface. If these marks get in the ferrule's sealing area, this can cause
it to fail sealing under high pressures. Even the normal "coining" that the ferrule
does t o the tubing during swaging may not be enough to draw these mars out, so don't depend on
that. The ferrule ends about 3/8-1/4" from the the tip of the tube, which
leaves a little breathing space for blunders of this sort. But if you get close
to or exceed that, just move your cut on top of mark furthest back and begin the
cut there, if you have enough spare tubing length, which is normally always a
good idea.
Dressing the cut
I used this tool to ream with (O2-cleaned of course!)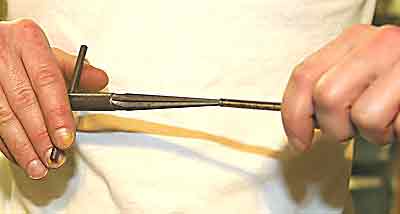
Alternatively, a drill bit could be carefully used as a reamer, but just enough
to begin an internal chamfer. I run a metal file across the cut to de-burr any
artifacts left from the reaming, and then file a tiny chamfer around the
outside edge of the tube. After all this, I wash the outside of the tube with Blue Gold
and rinse it carefully, trying not to let any fluid wick its way up inside the
tube via surface
tension. I try to get the tubing in place and locked down quickly after cleaning
to prevent as much ambient dust as possible from getting on the end.
Tube routing
To make the longer tubing runs, I usually took a wooden folding ruler and tried
to bend it around in the same shapes I wanted to run the tubing.
 This
measurement doesn't have to be too exact, because longer runs with bends and elbows
allow for stretching or shrinking to adjust for small under/over-sized length issues.
Allow for an extra 2-5% length on the longer runs. Discarding long runs because they are just too
short is not worth sacrificing a bit of cheap tubing over to get it fitted
correctly in the first place. For shorter
runs, I made a habit of allowing allow a little extra length (10%) to allow for
additional fitting flexibility. Cut off any excess if it's going to just
get in the way. Also allow about 1-2"
for the final bends into the fitting. SwageLok and others recommend 13/16" of
perfectly straight section where the tube is inserted into the fitting, next to
where a usual bend might need to be located. See
their
PDF for more information on this. Armed with a measurement, cut a piece of tubing off the base stock.
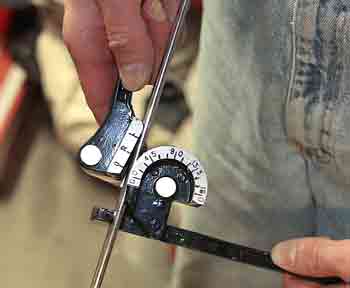
Next, the tube had to be bent into its final
shape. I sometimes used my bare hands to bend tubing, but in order to prevent
the tubing from collapsing into a weakened, ovular, shape, a tube-bending tool
is recommended, especially for short bends. Pictured at the left is one I
picked up from
Harbor Freight for $7
I would sometimes have to place one end of the fresh-cut tube end in its target fitting to
figure out where the bends had to be. If you cut your tubing with a hack-saw,
de-burr the outside corner of the cut with a metal file to prevent the normal
metal burrs from scratching the sealing-surface inside the lower ferrule before
the initial fitting. If using a clamp-cutter, the cut-end is usually rounded off, but I
have seen a lip on the outside edge before and deserves careful attention as
well. It sometimes happens when greater pressure is used with the
clamp-cutter. Also, putting the tube in and
out of the fitting can introduce dust or other contaminants onto the ferrules
that might reduce their sealing efficiency. Keep everything as clean as
possible! After temporarily placing one tube end in its fitting, use a marker to mark
the spot(s) off where the next bend(s) should be. Remove the tube out
of the one fitting, make the bend(s), and put it back for another test-fit and
marking. I recommend making one bend at a time between testing when runs
have more than one acute or obtuse angle. Repeat the fitting and bending
until the tube looks just about right. There should be little need to
insert the second tube-end in its fitting.
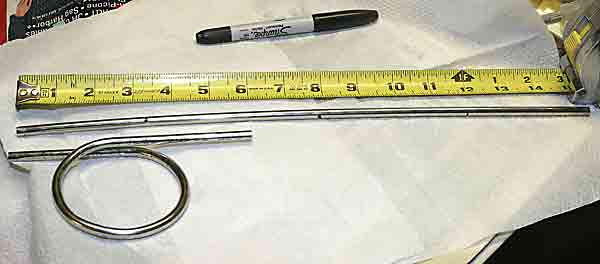 Making
the tubing pigtails were difficult to work with since the bottles were not all identically
the exact same distance (or alignment) between the fittings. This required me to
stretch some pigtails out and compress others. The pigtails with the smallest
loops took more effort and was a good argument to use larger (3"-5") loops. This
is another good reason not to make the tails too small!
In the picture to the left, I cut out a 15" length and divided it into
sections and marked them as a reference guide to use when bending. A
completed pigtail is also nice to have as a reference. Generally, for the
pigtails, it was best to spin the cylinders a couple degrees from each other so
that the tube fitting on each matched the normal lateral offset of the pigtail's
ends. You can see the offset in the completed pigtail in the picture. Otherwise, the pigtail
ends have to bent laterally together so that the tube ends'
centers are perfectly aligned. This method is not recommended since you risk
putting a bit of stress on the ferrules.
Next, I would bend half the pigtail, then bend the rest of it. This
helped keep the loop symmetrical since the bending tool is not a precision
instrument and takes some
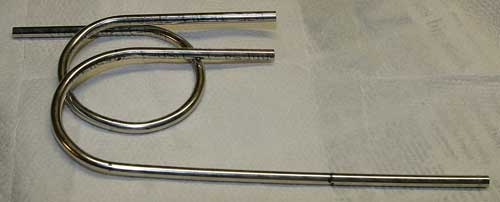 getting-used
to make bends exactly the way you want.
Connections
After getting the the tube bent correctly and ready to be locked in place,
remove it, perform a final dressing on the ends if it has not been done already,
and clean the ends as noted previously.
A properly-swaged ferrule will look like the following picture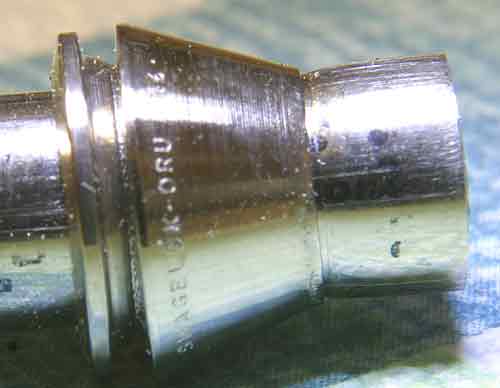 .
Notice how the lower ferrule bends the tube inwards as the nut is tightened, to
create a swaged-fit. The white specs are ambient dust!
I wasted about 5 sets of
ferrules from mistakes during tube-assembly, learning things the hard way like cutting pieces just
slightly too short, etc. I recommend having a few extra sets of ferrules handy
for these sorts of learning experiences. You may even have ferrules that
you can swipe from excess fittings.
The tube end should be perfectly straight for 13/16" of an inch, and free of
any marring/ marks. This requires some care when handling the tubing. If a
tube-end has even a slight bend in it less than 13/16" from the tip, it may
not seal as well as you would like. If in doubt, cut it off and start over. These bends can cause binding on the ferrules
and prevent the tube from seating all the way in, which can lead to a
dangerously-weakened swage. The picture below (right-side ferrule) shows a
possible example of the tube getting pulled out of the ferrule before the nut
was was locked down.
Insert the tubes as straight as possible into the fitting nut. It should go in
very easy and even have some play. You should not have loosen the nut to allow
the tube to be inserted to its full depth. If the tube won't go in all the way,
remove the tube and add a slight bend (by hand if possible) beyond the 13/16"
minimum distance in order to get the alignment
of the tube and fitting more exact. This is another reason why it is good to have
some extra slack in the tube length or at least two bends in the route.
Make sure the tubing bottoms out in the fitting!
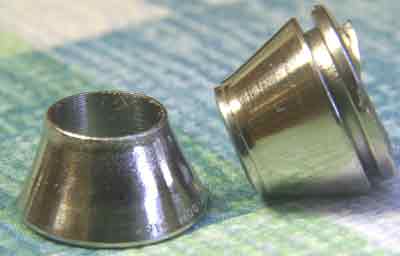 When wrestling with some short runs that were not lining up easily I sometimes found that I was pulling the
opposite end out of one
fitting while trying to put the the other end in its fitting or getting the tubing bent just right
in order to do so. This sometimes required me to lock one end of the tube
in place and then wrestle with the
free end. Doing this puts stress on, and could bend/loosen, the already-tightened end. This is
NOT recommended! Doing this may cause a tube to begin bending too close to the secured
nut, and actually have the effect of a crowbar pulling the tubing through
the swaged ferrule if enough force is applied, not to mention loosening the seal
between the ferrule and fitting. The ferrule on the left in this picture
is conically warped to one side because of this. Also note that its
outside sealing surface has been strained and is not longer very smooth for a
high-quality seal.
Before locking a ferrule-nut down, make sure it is finger-tight, as it should
have been before inserting the tubing. The tubing should be fully bottomed out
in the fitting. Don't rely on feel alone to determine this - I have had some
ends that only made it to the bottom of the lower ferrule when the tube was
under a little stress from its position and wouldn't allow it to seat all the
way. The ferrule on the right in the picture is an example of what could
happen. If you aren't completely sure if the tube is bottomed out or not,
pull the tube back out and put a mark on the exposed section of tube, about
where it should contact the nut but still be visible and use this as a visual
reference point to determine how far the tube has gone into the fitting. If the
ferrule has not swaged itself high enough onto the tube, the tube could actually
blow the tube right out of the fitting.
Next, scribe or use a marker to mark a point on the nut's surface.
The mark can either pointing
up, down, or 90' from there. The nut gets turned one and one quarter turns,
exactly. The mark is just a reference as to where the start-point was at. This tightening only
applies to the initial swage. If you have to take the tube loose and tighten it
again, the nut has to go further than it did initially until just after "the
resistance builds up quickly" Refer to the SwageLok PDF previously mentioned, as
it has all this information written there. SwageLok has a nut-to-fitting
gap-measurement tool when in doubt. Be aware that you can only re-tighten
the fittings so many times before the ferrule is narrowed/mashed down too far
to seal on the fitting's flare.
GO TO PAGE:
1 - Introduction
2 - Bank Bottles
3 - Fittings 5 -
Valves 6 - Manifolds,
whips, gauges,O2-cleaning 7
- Results & Pictures
 All
the tubing used for this project was oxygen-cleaned. It shouldn't be
necessary for air banks, but wasn't much trouble to do anyway. I use a
submersible ornamental-pond pump to push a 5% solution of
Blue Gold through
pipes, tubes, etc. The pump sits in a bucket of the solution and pumps it
in one end of the tube by means of some fittings, flexible tubing, and hose
clamps. The other end of whatever is being flushed has to be aimed back in
to the bucket. For long straight lengths of tubing, I just made a U-bend
halfway up the pipe. Pictured are a couple inter-stage cooling coils from
a RIX compressor that were getting flushed overnight.


 When wrestling with some short runs that were not lining up easily I sometimes found that I was pulling the
opposite end out of one
fitting while trying to put the the other end in its fitting or getting the tubing bent just right
in order to do so. This sometimes required me to lock one end of the tube
in place and then wrestle with the
free end. Doing this puts stress on, and could bend/loosen, the already-tightened end. This is
NOT recommended! Doing this may cause a tube to begin bending too close to the secured
nut, and actually have the effect of a crowbar pulling the tubing through
the swaged ferrule if enough force is applied, not to mention loosening the seal
between the ferrule and fitting. The ferrule on the left in this picture
is conically warped to one side because of this. Also note that its
outside sealing surface has been strained and is not longer very smooth for a
high-quality seal.